The baby blanket for my friend who is a brand new mom is complete! So even though I don't have 30 projects listed I have started moving forward on completing a few.
I learned this process from one of my besties and while her talent and creativity at times are endless I do believe she looked it up. I did not take pictures of the process which I now realize that I should have - I'll get better at blogging about projects, I promise!
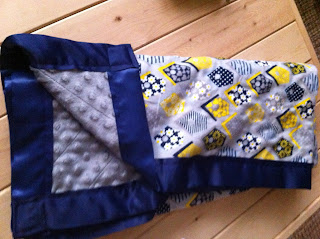
First step - supplies. I picked two fabrics, one cute one that works for the mom and baby, you can go traditional blue or pink. My dear friend is not one of the most traditional ladies so when I came across this adorable blue, yellow, and gray fabric with bird houses I grabbed it (even though she has a daughter, bucking gender norms left and right!). Next you want the other side of the blanket, I went with a super soft gray minky which you can't help but continue to touch it's so amazingly soft! I usually bind my blankets with a satin or flat binding. There are definitely other ways to finish off your edges but I like the contrast it adds to the overall blanket. I went with a wide satin navy binding that matched the blue in the birdhouse fabric and contrasted nicely with the gray. Make sure you have a lot of quilting pins, they really are a lifesaver when it comes to keeping your fabric lined up for sewing.
I didn't measure and really just went off the dimensions of my fabrics but that is your call. There are definitely specific crib blanket dimensions if you need that level of detail. Assuming you have relatively straight edges line up your fabrics back to back, both with the sides you want showing facing out. Now start pinning! Pin your edge and start working across the whole blanket, I usually start in a corner and work my way diagonally across the fabric. This way you work out any spacing issues and don't end up with bunching. My pins end up approx 4" apart from each other throughout but it's not exact..
Once you are all pinned it's time to sew. Using my sewing machine I sew lines on the diagonal evenly spaced across the blanket. What's wonderful about the minky fabric is it has dots in a grid which in effect create guidelines for very straight stitching across. So if you're using minky I made a line every 3 dots, if not it's approximately every 3". This can be adjusted to match your aesthetic. You may like wider spaced in between. I only sew in one direction so my blanket has one directional diagonal lines across, however it would be easy at this point to go in the opposite direction and create a diamond pattern if you chose to.
Now you have your blanket but with unfinished edges. This was the trickiest part for me and, I'll be honest, would still like to find a better way to do this but in the end it looked pretty good, hand-made, but pretty good. I took the wide edge binding and as is put the blanket edge in up to the fold. I pinned all sides and had the binding reach the edge on every corner so that each side overlapped with the next and covered both edges. Then lining up the needle (on the middle setting) with the edge (inner edge, closest to middle of the blanket) sewed all sides. I left the corners open so that I could work on the detail needed to make it look clean.
Suggestions having tried this and not being totally happy? Maybe pin and sew one side at a time, leaving the corners free to be sewn at the end. Hand sew the corners for a more finished, purposeful look.
Iron and send off! Here's the finished blanket folded and ready to go. I'm also sending her two of my onesies, an octopus and a blowfish, from RadBaby and a card.
Babies are definitely a fun excuse to get your crafting on!
I learned this process from one of my besties and while her talent and creativity at times are endless I do believe she looked it up. I did not take pictures of the process which I now realize that I should have - I'll get better at blogging about projects, I promise!
First step - supplies. I picked two fabrics, one cute one that works for the mom and baby, you can go traditional blue or pink. My dear friend is not one of the most traditional ladies so when I came across this adorable blue, yellow, and gray fabric with bird houses I grabbed it (even though she has a daughter, bucking gender norms left and right!). Next you want the other side of the blanket, I went with a super soft gray minky which you can't help but continue to touch it's so amazingly soft! I usually bind my blankets with a satin or flat binding. There are definitely other ways to finish off your edges but I like the contrast it adds to the overall blanket. I went with a wide satin navy binding that matched the blue in the birdhouse fabric and contrasted nicely with the gray. Make sure you have a lot of quilting pins, they really are a lifesaver when it comes to keeping your fabric lined up for sewing.
I didn't measure and really just went off the dimensions of my fabrics but that is your call. There are definitely specific crib blanket dimensions if you need that level of detail. Assuming you have relatively straight edges line up your fabrics back to back, both with the sides you want showing facing out. Now start pinning! Pin your edge and start working across the whole blanket, I usually start in a corner and work my way diagonally across the fabric. This way you work out any spacing issues and don't end up with bunching. My pins end up approx 4" apart from each other throughout but it's not exact..
Once you are all pinned it's time to sew. Using my sewing machine I sew lines on the diagonal evenly spaced across the blanket. What's wonderful about the minky fabric is it has dots in a grid which in effect create guidelines for very straight stitching across. So if you're using minky I made a line every 3 dots, if not it's approximately every 3". This can be adjusted to match your aesthetic. You may like wider spaced in between. I only sew in one direction so my blanket has one directional diagonal lines across, however it would be easy at this point to go in the opposite direction and create a diamond pattern if you chose to.
Now you have your blanket but with unfinished edges. This was the trickiest part for me and, I'll be honest, would still like to find a better way to do this but in the end it looked pretty good, hand-made, but pretty good. I took the wide edge binding and as is put the blanket edge in up to the fold. I pinned all sides and had the binding reach the edge on every corner so that each side overlapped with the next and covered both edges. Then lining up the needle (on the middle setting) with the edge (inner edge, closest to middle of the blanket) sewed all sides. I left the corners open so that I could work on the detail needed to make it look clean.
Suggestions having tried this and not being totally happy? Maybe pin and sew one side at a time, leaving the corners free to be sewn at the end. Hand sew the corners for a more finished, purposeful look.
Iron and send off! Here's the finished blanket folded and ready to go. I'm also sending her two of my onesies, an octopus and a blowfish, from RadBaby and a card.
Babies are definitely a fun excuse to get your crafting on!
No comments:
Post a Comment