
Wednesday, December 25, 2013
Monday, December 23, 2013
Ladybugs Gatherings
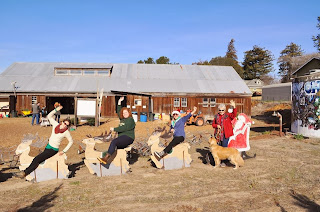
My family is not a family that sits around and lounges when we get together for holidays, as much as I may try to passive aggressively get this to be the case. No, we are a family who starts the day off with a multi-mile hike up and down rocky trails near. This is exactly what we did yesterday after all of our out of towners arrived the day before.
On the hike we encountered something pretty crazy and incredible, something that I now know (after some research) was ladybug hibernation! Something that, if they weren't ladybugs, looks like the beginning of a horror movie - though I was alone in this assessment.
As we came around a corner there were some fallen logs, bathed in sun and absolutely covered in thousands of ladybugs. This morning I looked up what could be happening and found the following information.
Ladybug adults hibernate, usually gathering in large aggregations in protected places.This must be what we were seeing but it was pretty incredible up close. Check out the video we got below.
As days get shorter and temperatures fall, ladybugs seek shelter behind bark, under leaves, or in other protected locations. Thousands of ladybugs may gather in the same location, taking advantage of the collective warmth of a colony. Asian multicolored ladybugs, an invasive species in North America, has earned a reputation as a home invader. These beetles tend to move indoors for winter, where they can become a nuisance in people's houses. Convergent ladybugs gather in the mountains in such numbers that collectors can scoop them up by the bucket.
Wednesday, December 18, 2013
You know you're 30 when...
Truthfully I thought something like this would come a bit later in life but, no such luck.
I have an unexplained neck pain. I have now had an aches and pains discussion with my other 30-something coworker. I'm not ready to have these conversations but they are happening.
Seriously, radiating neck pain (not just one pinched place) with an unknown cause. Not an unknown cause like we used to have in our 20s where it was because we were drunk and having too much fun to remember it. No, this is no cause as in my body is aging and that occasionally causes inexplicable injuries.
Sobering.
Tuesday, December 17, 2013
Oh Christmas Tree Oh Christmas Tree
This past Sunday I went with my family to cut down trees, a tradition from our childhood that has been on a bit of a hiatus but was revived this year. I'm definitely the one in my family who holds on tight to traditions and occasionally has to fight for them, so I was quite happy to have this one coming back into our lives.
We gathered at 9am for the hour-ish drive to breakfast and then the tree farm. All was not as it used to be. Our traditional breakfast spot of yore is now an Irish pub (generally not a problem for our clan) that does not open until 11am (whoops). We asked a couple locals and got another diner recommendation as a substitute. With full bellies we piled back in the car and headed to the Christmas tree farm. As we pulled in there were only two cars where normally we had to wait and circle for parking. Undeterred we got out and excitedly headed in only to be quickly told that they are sold out. Sold out!?! With nearly 3 weeks left til Christmas, say it ain't so. This hiccup did not dampen our spirits and we decided to take a few Christmas photos there even if we couldn't yet get our trees.

We gathered at 9am for the hour-ish drive to breakfast and then the tree farm. All was not as it used to be. Our traditional breakfast spot of yore is now an Irish pub (generally not a problem for our clan) that does not open until 11am (whoops). We asked a couple locals and got another diner recommendation as a substitute. With full bellies we piled back in the car and headed to the Christmas tree farm. As we pulled in there were only two cars where normally we had to wait and circle for parking. Undeterred we got out and excitedly headed in only to be quickly told that they are sold out. Sold out!?! With nearly 3 weeks left til Christmas, say it ain't so. This hiccup did not dampen our spirits and we decided to take a few Christmas photos there even if we couldn't yet get our trees.

Directions in hand we headed toward another Christmas tree farm where we were assured that there were trees left. And there were. Though it took us nearly 2 hours to find the perfect two trees we did it. My sister and I have taken over the manual labor part from our parents this year - cause, you know, maturity. This did make me realize why I always thought this was more fun than my dad did. That is not an easy task.
Happy to report the trees are now both in their respective homes and set up. I even had a burst of inspiration last night, following yet another round of Christmas present shopping, and decorated it a bit. Definitely brought a big smile to my face, followed immediately by exhaustion after hauling it in from outside setting it up, up and down the stairs for the decorations, and getting it in just the right place. I definitely fell asleep on the couch admiring my handiwork.
Merry Christmas all!

Tuesday, December 10, 2013
DIY Christmas Trees
So I have had the supplies for this project for ages and finally my friend and I attempted it. The project I did is kind of a combination of these two original pins:


True to myself I made do with what I had on hand which was a very very thin and uneven green thread. Pulled it through the glue, corn starch mixture and wrapped it around my styrofoam cones of three sizes. Before starting I wrapped the cones in saran wrap and then put a layer of vaseline on that, to (reportedly) allow the "trees" to easily come off the molds once dry.
As you can probably guess this is not exactly how it went down. While it was a wonderfully fun and messy project I could tell pretty early on that these trees were not going to politely pop off of their forms without some work.
Lessons I learned:
- When not using a balloon that one can pop and remove from the shape it is necessary to wrap loose, even with the vaseline and saran wrap.
- Use real string that is not super thin and breaks apart in your glue mixture - just takes so much longer to wrap it.
- A glue and corn starch mixture will not dry clear. I know this should have been obvious but call it a brain fart. Not a mistake because they are meant to be Christmas-y so I'm calling them frosted, but still.
- If you smash a foam cone enough it will eventually pop out from your "tree". Just make sure that your tarp from the glue messiness is still down for this part too.
End results are not so bad. Tried out two different styles of wrapping the string, and I'm pretty happy with a new DIY decoration for this year.


Friend Christmas
My core group of besties - truthfully they're family at this point - and I have decided, in the last few years, that we don't really need anything and we don't need to be spending ridiculous amounts of money on each other for gifts. So, last year we wrote up about 50-60 theme ideas and put them in a bowl and picked. Each year we'll draw a new theme and get each other something that fits the theme but we are not allowed to spend more than $10 on each person's gift. The one of us who's good at saving things keeps our theme ideas and each year as the holidays roll near we draw the theme of the year.
Last year's theme was Middle School. As you can imagine this resulted in some pretty hilarious gifts, including friendship bracelets and hair dye (we were in middle school in the 90s after all).
 This year's theme: Diamonds! Diamonds for under $10 dollars? Clearly we are going to have to get creative. I have decided on my present and it is currently being crafted in my workshop, though with no elves to help it is going rather slowly, as my workshop is my garage and my garage is rather cold in the evenings after work. I obviously can't tell you what it is, on the off chance, that one of my ladies reads the blog, but as I'm sure you can all deduce it is from a Pinterest project, or two, and I hope it works.
What would you get/make for a Diamonds theme gift with a $10 max?
Monday, December 9, 2013
Mason Jar Project - Check!
A little while back I posted a Pinterest project that I was going to try to make, this one. Well I did, it turned out pretty well and I was finally better about documenting my steps in photos.
First was to determine what piece of board I wanted my jars to attach to. I actually had this piece on hand and so decided not to spend extra money on another piece and work with what I had. After a Home Depot run to purchase the plumbing clamps and hooks (I added these on a whim - not part of the original project) I was ready to start.
 Immediately I ran into my first hiccup. No where in the Pinterest project does it clearly communicate how the plumbing clamps are "screwed on" to the board - time to improvise! I didn't have any nails small enough to get through the slats on the clamp itself, and I didn't have wide enough staples in the staple gun to span the width and securely hold them in place. I ended up taking two screws and placing them on either side of the clamp. Not screwing them in all the way first, placing the plumbing clamp and then screwing them both down so the edges are held in place by the lips of the screws. Be sure to place the clamps in a way that still allows you to adjust the size around the neck of your mason jars.
 Next I placed the hooks. I measured and placed them roughly 1.5" apart from each other. First drilling a small pilot hole then hand screwing in the screws on the bottom of the board. I want these to be for hanging necklaces. I have some great earring holders made from frames and screen but at this point no good way to store and display my necklaces. The hooks go all the way across the bottom.
The end result before testing out my jars allowed for 4 mason jars and hooks along the bottom. I attached at sawtooth picture hanger in the middle of the back (no picture) to allow for easier hanging. I substituted much longer nails for the ones that came with that piece of hardware for some added support and security.

 Here's the finished product. Not exactly as I imagined in terms of functionality but overall I'm pretty happy with the resulting look. Please forgive the grainy picture, as you can see I'm still deciding what exactly to store in each of my jars.
First was to determine what piece of board I wanted my jars to attach to. I actually had this piece on hand and so decided not to spend extra money on another piece and work with what I had. After a Home Depot run to purchase the plumbing clamps and hooks (I added these on a whim - not part of the original project) I was ready to start.
 Immediately I ran into my first hiccup. No where in the Pinterest project does it clearly communicate how the plumbing clamps are "screwed on" to the board - time to improvise! I didn't have any nails small enough to get through the slats on the clamp itself, and I didn't have wide enough staples in the staple gun to span the width and securely hold them in place. I ended up taking two screws and placing them on either side of the clamp. Not screwing them in all the way first, placing the plumbing clamp and then screwing them both down so the edges are held in place by the lips of the screws. Be sure to place the clamps in a way that still allows you to adjust the size around the neck of your mason jars.
The end result before testing out my jars allowed for 4 mason jars and hooks along the bottom. I attached at sawtooth picture hanger in the middle of the back (no picture) to allow for easier hanging. I substituted much longer nails for the ones that came with that piece of hardware for some added support and security.

Now it's time for the second hiccup. Due to my improvising for getting the plumbing clamps to attach to the board, the jars while mostly secure were not held in as tightly as I would have wanted by the clamps. They were almost secure enough but had wiggle that sent visions of mason jars plummeting to my floor and shattering through my head. Originally I liked the idea that I would be able to take the jars down as needed from the adjustable plumbing clamps but gave that luxury up for a more secure hold. I used clear, heavy duty epoxy glue, a dime size dot on the jar and a dime size dot of the plumbing clamp where the screws held it to the board. Then placed the jars and tightened. I allowed this to dry overnight and then it was time to hang.
 Here's the finished product. Not exactly as I imagined in terms of functionality but overall I'm pretty happy with the resulting look. Please forgive the grainy picture, as you can see I'm still deciding what exactly to store in each of my jars.
WW Update
Sticking with the idea that making this public and paying for the service will help me stay motivated and on track, here is another update on the Weight Watchers journey (this time around).
First an admission, I did not weigh in last week. It was the week following Thanksgiving and the week of lady days and mostly I was not feeling up to seeing a raise in the number on the scale. I realize this was me being a scaredy cat but I didn't have it in me. So I went one more week, attempting to stay on track and making it to Zumba twice and go from there this week.
This morning I woke up about an hour late - either alarms didn't go off or I woke up, turned them off and then went back to sleep with no memory of doing so (it's happened before). I could have easily used this an excuse to not weigh in this morning but that is my old pattern and I'm working on new patterns. I weighed in, braced to face the number whatever it was and...it was lower!! In fact, it was lower by 3.8 lbs - almost the recommended 2 lbs per week which felt great considering Thanksgiving was part of one of those weeks!
Not only that, but when I put it in the tracker...
 10lbs down! That was my personal goal to reach 10 lbs down by Christmas, now I can reset that and keep it going. Not a bad way to start a Monday, even if I did oversleep.
First an admission, I did not weigh in last week. It was the week following Thanksgiving and the week of lady days and mostly I was not feeling up to seeing a raise in the number on the scale. I realize this was me being a scaredy cat but I didn't have it in me. So I went one more week, attempting to stay on track and making it to Zumba twice and go from there this week.
This morning I woke up about an hour late - either alarms didn't go off or I woke up, turned them off and then went back to sleep with no memory of doing so (it's happened before). I could have easily used this an excuse to not weigh in this morning but that is my old pattern and I'm working on new patterns. I weighed in, braced to face the number whatever it was and...it was lower!! In fact, it was lower by 3.8 lbs - almost the recommended 2 lbs per week which felt great considering Thanksgiving was part of one of those weeks!
Not only that, but when I put it in the tracker...

Tuesday, December 3, 2013
Adding myself to Bloglovin
Follow my blog with Bloglovin
I started using Bloglovin as a way to bring all the blogs I read into one stream and also made sure my blog was visible on there.
I started using Bloglovin as a way to bring all the blogs I read into one stream and also made sure my blog was visible on there.
Mildly Obsessed
 I've always loved pin-ups. Love the glamour they belied and at times they convinced me I was born in the wrong decade - though I do love living after the birth of feminism more since I can still seek out and find the fabulous fashions. However as a thick chick I didn't necessarily identify with the images personally. Until now!
This is Hilda, a pin-up from the 1950s and a creation by illustrator Duane Bryers. I am now mildly obsessed. Not only is she thick and fabulous but every one of the images is fun, mischevious, and a little awkward - now that is something I can personally identify with.
I found this on Messy Nessy Chic, who linked to Toil Girls, a site that actually conducted an interview with Duane Bryers about his Hilda paintings. Then I fell down the rabbit hole. The google image search gives an enormous amount of images, and there is even a Hilda! Pinterest board. I feel like it's fair to warn you that you can expect to see a Hilda image pop up here every once in a while. They make me smile, a lot.
Based on what I'm reading I may be late to the game on this but I am happy to have finally found her and can't wait to keep exploring Hilda's world.
Subscribe to:
Posts (Atom)