Showing posts with label RadBaby. Show all posts

Monday, April 27, 2015

Luxe leash for less

Latest dive into Pinterest project waters completed.  For a while now I've been obsessing over the rope dog leashes that are all around online.  I love how they look (no shock here, they are slightly nautical after all) and how they feel.  What I don't love is how much they cost! Here is one of the ones that was my inspiration but averaging $50 is out of my desired price range.
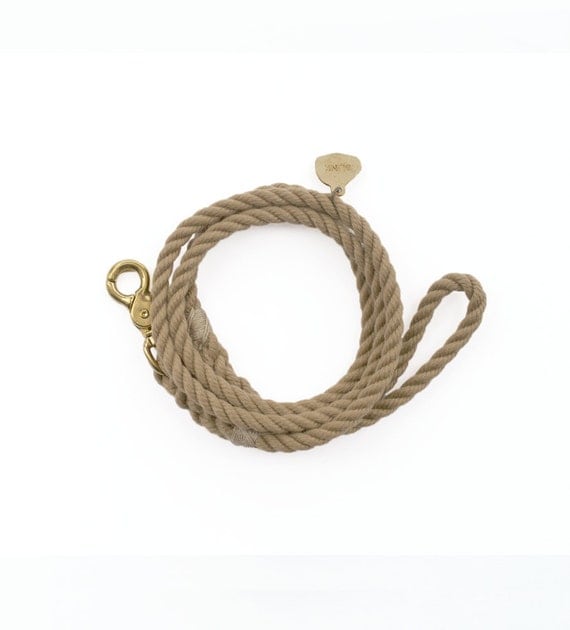
Marine-Grade Dog Leash in color Traveler  
Now here's mine:


I am kind of obsessed with mine! I'm totally in love with the hardware and the rich look of the final product. It has weight and a great feel.  The only thing I added that is not in the photo is that I wrapped hemp twine around the top part of the handle loop to create a more visible handle piece. 

Forgive me for not taking photos of the process but I can give you a breakdown of the supplies and what it took to get the finished product which ran me an approx. cost of $13 for the leash and it's parts (though more out of pocket for the total amount of rope I actually purchased)
  • The rope is a 1/2" diameter pure cotton rope from KarensWeddingShop on Etsy, it was $16.29 plus shipping for 25' of the rope (so I have a bunch left over!).  She uses hers for nautical decor projects but it is sturdy quality rope. This seller is based in Canada so the shipping was steep and brought the total to $36.00 but if you divide that for the amount of rope I used for the leash (approx. 5 ft) then we're still only talking about $7.20 for the rope used, with some left over for more projects. 
  • Next were the rope clamps that hold the rope together where it's looped, which I found on Amazon.  They are most typically used for horse tack and to create lead ropes. I got the solid brass ones because they matched the look I wanted but they come in silver as well for a bit less if you want to go that way. They are about $3.00 each. I think you can probably also find these items at a horse tack shop if you have any of those local to you. 
  • The last piece was the hook.  I found mine at a local ACE Hardware (one of my favorite places) and got a couple options, again in the brass/gold color. Remember to get one with a big enough loop on the end to fit your rope through.  These are around $2.00 each.

I love the white but realized the impracticality of it so I have plans to get some gray dye to have on hand if it gets too dingy but right now I'm loving it as is.  

Next I want to make a collar to match for Mabel but thinking I may want a narrower bit of rope because this does have more haft to it than would be ideal for a collar. Also, I need to figure out a better way to clasp/clamp the ropes. I'll keep you posted.

Also a next step is to make more using the rest of the rope and get it up on RadBaby.

Sunday, April 5, 2015

You would make a horrible bulimic

I've recently found a new track of inspiration that has gotten me back to doing some art which is actually a wonderful bit of calm and sanity these days for which I am incredibly grateful. Hand lettering and illustration.  This is not really a direction I've ever explored before but I was drawn to the look of the hand lettered signs that are ever so popular these days and then would be over come by that moment of "ugh, I'm not paying for this, I can make that myself." Only this time I actually did!

I don't think it's that much of a departure because I was also drawn to doing art that was not separate from the human experience. These are less related to the human experience in the abstract and more related to the human experience of me and my friends.

I have two completed, one that I like and show below that are based on either sayings, quotes, or in this case an joke that resulted from a ridiculous conversation. Luckily, I have a best friend who as lists of quotes from years of our hanging out that are just begging to be illustrated.  Here's hoping the inspiration lasts because I really enjoy the end product of this one.


Entitled "Yum", printed on heavy weight paper and, if you're so inclined, is for sale at RadBaby.

Monday, April 14, 2014

30th year is nearing a close - time to check the projects list

As you are all clearly aware, I have avoided checking in on this list for the last several months.  While, I haven't done nothing, I havent' done a whole lot either.  But, as Spring gathers speed on it's way to Summer and my 30th year gets ever closer to a close it's time to evaluate (and give you an update on the RVT2103 - to come soon).  Ok, to the list:
  1. New Bed:  DONE! I think that there can definitely be a follow-up project to add a few more items tot the decor of the room overall, including new bedding but the new bed is in and great!
  2. Color in the Kitchen: Truthfully, haven't even visited this one
  3. Build 4 x 4 workbench:  As seen at an artist studio at American Steel Studios.  DONE! I'm going to call this done, but amended.  I recently created the top of a workshop table based on a Pinterest project I saw but using scraps I had in the workshop.  Currently it is missing legs but it's resting on top of my sawhorses and maybe provides even more functionality than the original project.
  4. Build nightstands: DONE!  Really happy with my suitcase nightstand and looking for a second suitcase to complete the set.
  5. Run a race.  Hmm, didn't sign up for one. If I wanted to excuse myself I could talk about how I've run them in the past, and I've recently timed myself running (like a race against myself).  So, done?
  6. Front yard makeover: Partially done/Postponed, my grass and other plants are doing really well.  I added some more plants for pops of color and some along the side of the house.  Happy for now with long term plan for xeriscaping.
  7. Back yard makeover: Partially done.  I have moved several plants and created an all succulent planter. They are starting to bloom and I can't wait for it to fill in!  I also planted two tomato plants, a tomatillo, zucchini and carrots.  No new fruit trees yet but still on the list.
  8. Complete one new woodblock: Done, pictures to come.  I'm not in love with it but I don't hate it, which is a start.
  9. Take an art class
  10. Make a "pouf": Here's one project but maybe search because I know there were a couple that did it on the cheap using IKEA rugs I think. Still have not attempted it yet, however.
  11. Sew a complete item of clothing (more complicated than a skirt though) using a pattern. DONE. I made a fairly hideous pair of kulots/gaucho pants for our Troop Beverly Hills Halloween costume this year.  While it was not a true pattern, I did use a pair of pants I already have to create this pair and had to make some sizing adjustments and amendments as I went.  Let's just say I'm not destined for Project Runway anytime soon. 
  12. Design and get a tattoo
  13. Make Christmas presents for my neighbors: Done-ish, I did not make Christmas presents for my neighbors but I did make really adorable Christmas presents in mason drinking glasses for my coworkers, which I'm counting.
  14. Build and paint a bean bag toss game: Canceled, felt like too much time but have done some other wood working projects
  15. Sew baby blanket:  DONE! See the post about making the blanket.  I recently got a photo back from my friend with her one month old swaddled up in it - baby adorableness.  I also have two more babies coming that need blankets, but not for this list!
  16. Add a new item for sale to RadBaby: DONE!  See the post about the new earrings we added.
  17. Complete a Coursera course: DONE I completed all the lectures and assignments for Dino 101 - it was awesome.  I have given up on the Intro to Computational Design.  I enjoyed the first two modules, programming and photoshop, but the third is audio which does not interest me.
  18. Create a housewarming gift for friends that are moving. DONE!  I created a great housewarming gift in a mason jar for my best friend's brother and his girlfriend.  It took me forever to give to them but that is not part of this project so there.
  19. Add shelves and/or decor to the bathroom: DONE!  This one was a project from Pinterest, and a rare situation where I actually like my version more than the Pin.
  20. Go to Zumba classes 2 times a week for at least a month. DONE!  Successfully accomplished and still going.  With the exception of some sick days we have been consistently going every week and plan to keep at it. It's a great break and separation from the day.  Plus an amazing instructor, which makes all the difference.
  21. Attach a charging pad in the new nightstand so that phone can charge just sitting on the nightstand. Canceled, after researching the cost of a charging pad this really wasn't worth it.  But it would be good to build something for my cords and charges to live in, other than the floor.
  22. Build an acoustic speaker for iphones. DONE!  I actually built two, and gave one to Meg for her birthday.  I'm using this idea as a prototype for the next Coursera class I'm taking (Design) and am hoping to refine the design even more.  
  23. DIY Christmas decorations: Also from Pinterest, found these two projects and really enjoyed making and using them for decoration.  The DIY garland and the "Christmas Trees"
  24. Rehab a Dresser: DONE! Ok, so this wasn't technically a project for me but it was a project, I definitely helped lead the charge so I feel totally ok with counting this as a completed project on my list.
  25. Fix headliner in Petunia: DONE!  Not a total fix but makes me happier than it was and works with my budget.
  26. Rehab Armchair: DONE!  Great find at Goodwill, now an even better fit in my house.
  27. Salon wall in bedroom:  Been collecting frames as I go and the wall in my bedroom needs some love. Get them hung!
  28. Fix and paint/stain coffee table: The original project made in my workshop needs some TLC
  29. Plant Edibles: DONE!  Mentioned earlier but I planted two cherry tomato plants, carrots, a tomatillo and a zucchini plant.  I'll let you know what kind of harvest I get.
  30. Travel: DONE!  My travel bestie and I are going to Ireland this summer.  Details are coming together and ticket prices are being monitored.  This trip will get in just under the wire and I can't wait!
Wow, I have to admit that in the beginning I did not necessarily expect to be able to come up with 30 projects.  The list has definitely had some amendments and changes but overall it's pretty exciting to be able to see all that I've worked on for a year.  The bold are projects still to finish but 6 our of 30 ain't bad.

Saturday, September 14, 2013

Project #16: Complete!

#16 - Add a new item for sale on RadBaby.

We added retro style fabric button earrings.  Right now we have 2 styles - yellow and a coral and white.  The latter matches one of our aprons if anyone wanted to buy them as a gift.

This addition was inspired by my friend and trainer - who is full of great ideas all while making me want to die (what more can you ask for in a trainer).

I love this style of earring, it has a pinup/rockabilly feel and can go casual or great with a slightly fancier feel.  Anyway feeling pretty pleased and mildly smug about our new additions!

Coral and white retro fabric earrings    Bumblebee yellow fabric button earrings

Monday, September 2, 2013

One project down!

The baby blanket for my friend who is a brand new mom is complete!  So even though I don't have 30 projects listed I have started moving forward on completing a few.

I learned this process from one of my besties and while her talent and creativity at times are endless I do believe she looked it up. I did not take pictures of the process which I now realize that I should have - I'll get better at blogging about projects, I promise!

First step - supplies.  I picked two fabrics, one cute one that works for the mom and baby, you can go traditional blue or pink.  My dear friend is not one of the most traditional ladies so when I came across this adorable blue, yellow, and gray fabric with bird houses I grabbed it (even though she has a daughter, bucking gender norms left and right!).  Next you want the other side of the blanket, I went with a super soft gray minky which you can't help but continue to touch it's so amazingly soft!  I usually bind my blankets with a satin or flat binding.  There are definitely other ways to finish off your edges but I like the contrast it adds to the overall blanket.  I went with a wide satin navy binding that matched the blue in the birdhouse fabric and contrasted nicely with the gray.  Make sure you have a lot of quilting pins, they really are a lifesaver when it comes to keeping your fabric lined up for sewing.

I didn't measure and really just went off the dimensions of my fabrics but that is your call.  There are definitely specific crib blanket dimensions if you need that level of detail. Assuming you have relatively straight edges line up your fabrics back to back, both with the sides you want showing facing out.  Now start pinning!  Pin your edge and start working across the whole blanket, I usually start in a corner and work my way diagonally across the fabric.  This way you work out any spacing issues and don't end up with bunching.  My pins end up approx 4" apart from each other throughout but it's not exact..

Once you are all pinned it's time to sew.  Using my sewing machine I sew lines on the diagonal evenly spaced across the blanket.  What's wonderful about the minky fabric is it has dots in a grid which in effect create guidelines for very straight stitching across.  So if you're using minky I made a line every 3 dots, if not it's approximately every 3".  This can be adjusted to match your aesthetic. You may like wider spaced in between.  I only sew in one direction so my blanket has one directional diagonal lines across, however it would be easy at this point to go in the opposite direction and create a diamond pattern if you chose to.

Now you have your blanket but with unfinished edges.  This was the trickiest part for me and, I'll be honest, would still like to find a better way to do this but in the end it looked pretty good, hand-made, but pretty good.  I took the wide edge binding and as is put the blanket edge in up to the fold.  I pinned all sides and had the binding reach the edge on every corner so that each side overlapped with the next and covered both edges.  Then lining up the needle (on the middle setting) with the edge (inner edge, closest to middle of the blanket) sewed all sides.  I left the corners open so that I could work on the detail needed to make it look clean.

Suggestions having tried this and not being totally happy?  Maybe pin and sew one side at a time, leaving the corners free to be sewn at the end. Hand sew the corners for a more finished, purposeful look.

Iron and send off!  Here's the finished blanket folded and ready to go.  I'm also sending her two of my onesies, an octopus and a blowfish, from RadBaby and a card.

Babies are definitely a fun excuse to get your crafting on!